在计算机科学领域,数据结构和算法是开发高效程序的核心工具。无论你是初学者还是经验丰富的开发者,掌握这些概念都能帮助你构建更快、更稳定的应用程序。我们日常使用的软件,从搜索引擎到社交媒体,再到购物网站,无不依赖数据结构和算法的强大支持。一个好的数据结构可以优化存储和访问数据的方式,而高效的算法则可以显著提升任务的执行速度。
数组
几乎所有的编程语言都原生支持数组类型,因为数组是最简单的内存数据结构。数组存储一系列同一种数据类型的值,但在 JavaScript 中,数组中可以保存不同类型的值。大多数语言没有这个能力,因此本节中我们尽量避免这么做。
创建和初始化数组
在 JavaScript 声明、创建和初始化数组十分简单,就像下面这样。
 1
 2
 3
 4
 5
 6
 7
 8
 9
10
11
let daysOfWeek = new Array (); // {1}
daysOfWeek = new Array ( 7 ); // {2}
daysOfWeek = new Array (
'Sunday' ,
'Monday' ,
'Tuesday' ,
'Wednesday' ,
'Thursday' ,
'Friday' ,
'Saturday'
); // {3}
使用new关键字就能声明并初始化一个数组(行{1})。用这种方式,还可以创建一个指定长度的数组(行{2})。此外,我们也可以将数组元素作为参数传递给它的构造器(行{3})。
也可以只用中括号[]创建数组:
 1
 2
 3
 4
 5
 6
 7
 8
 9
10
11
let daysOfWeek = [];
daysOfWeek = [
'Sunday' ,
'Monday' ,
'Tuesday' ,
'Wednesday' ,
'Thursday' ,
'Friday' ,
'Saturday' ,
];
若想知道数组存储了多少个元素,可以使用数组的length属性。
访问元素和迭代数组
要访问数组中特定位置的元素,可以用中括号传递数值位置,得到想知道的值或者赋新的值。若想输出数组daysOfWeek中所有的元素,可以通过循环迭代数组、打印元素,如下所示:
1
2
3
for ( let i = 0 ; i < daysOfWeek . length ; i ++ ) {
console . log ( daysOfWeek [ i ]);
}
添加元素
假如有一个初始化为 0 到 9 个数组numbers。
1
let numbers = [ 0 , 1 , 2 , 3 , 4 , 5 , 6 , 7 , 8 , 9 ];
在数组末尾插入元素
在 JavaScript 中,数组是一个可以修改的对象。若添加元素,它会自动动态增长。若想在数组末尾插入元素,只要把值赋给数组中最后一个空位上的元素即可。
1
numbers [ numbers . length ] = 10 ;
当然,也可以赋给下标为numbers.length+2的元素,那么下标为numbers.length和numbers.length+1就会为空:
1
numbers [ numbers . length + 2 ] = 10 ;
通过push方法也可以将元素添加到数组的末尾。push方法能让我们添加任意个元素。
1
2
numbers . push ( 11 );
numbers . push ( 12 , 13 );
在数组开头插入元素
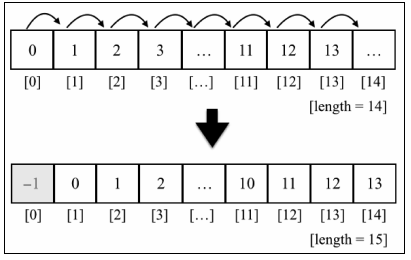
如果我们希望在数组中插入一个新元素(例如-1)到开头。为了实现这个需求,首先要腾出数组第一个元素的位置,把所有的元素向右移动一位。我们可以将其写成一个函数,甚至将方法直接添加到Array的原型上,使所有数组的实例都可以访问到该方法。
1
2
3
4
5
6
7
Array . prototype . insertFirstPosition = function ( value ) {
for ( let i = this . length ; i >= 0 ; i -- ) {
this [ i ] = this [ i - 1 ];
}
this [ 0 ] = value ;
};
numbers . insertFirstPosition ( - 1 );
下图描述了整个过程。
在 JavaScript 中,数组有一个名为unshift的方法可以直接将值插入数组的开头(背后逻辑和insertFirstPosition一样)。
1
2
numbers . unshift ( - 2 );
numbers . unshift ( - 4 , - 3 );
删除元素
从数组末尾删除元素
要从数组末尾删除元素,可以用pop方法。
从数组开头删除元素
要删除数组的第一个元素,可以用shift方法。
在任意位置添加或删除元素
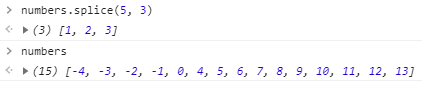
使用splice方法,指定位置就可以删除相应位置上指定数量的元素。
现在,我们想把数 2、3、4 插入数组中,放到之前删除元素的位置上,可以再次使用splice方法。
1
numbers.splice(5, 0, 2, 3, 4);
splice方法的第一个参数表示想要删除或插入的元素的索引值,第二个参数是删除元素的个数。第三个参数往后是要添加到数组中的值。
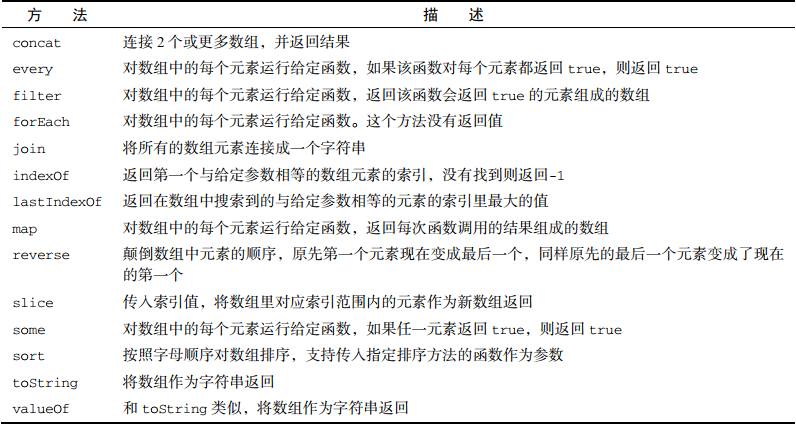
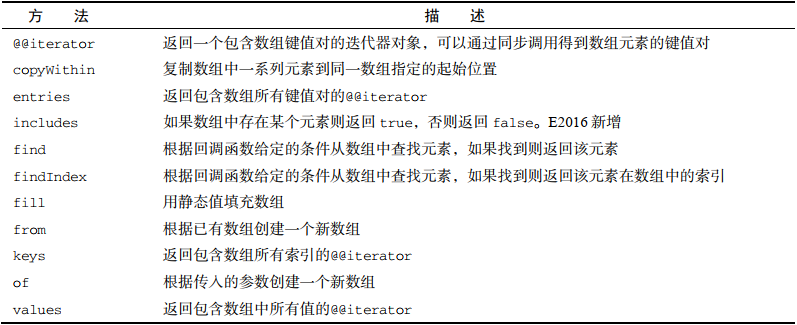
数组方法参考
JavaScript 中的数组有很多好用的方法,如下表所示:
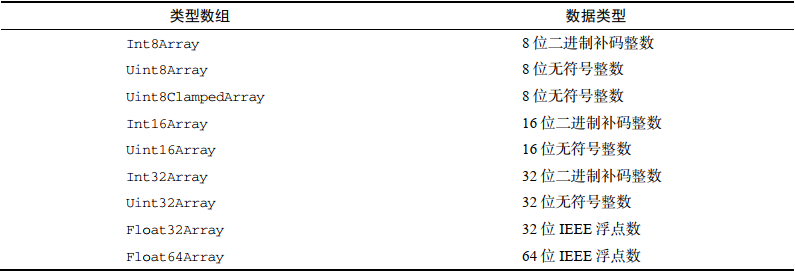
类型数组
类型数组用于存储单一类型的数据。其语法为let myArray = new TypedArray(length),其中TypedArray需替换为下表所列。
1
2
3
4
let int16 = new Int16Array ( 16 );
for ( let i = 0 ; i < int16 . length ; i ++ ) {
int16 [ i ] = i + 1 ;
}
栈
数组允许我们在任意位置上删除或添加元素。然而,有时候需要一种能在添加或删除元素时进行更多控制的数据结构。有两种类似于数组的数据结构在添加和删除元素时更为可控,它们就是栈和队列。
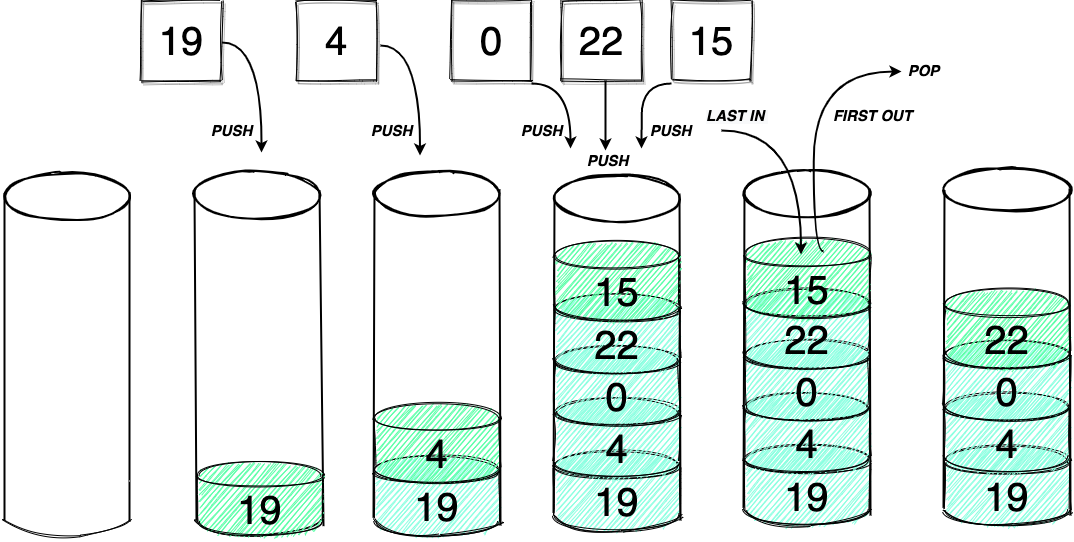
栈数据结构
栈是一种遵从后进先出(Last In First Out,LIFO)原则的有序集合。新添加或待删除的元素都保存在栈的同一端,称为栈顶,另一端称为栈底。
在栈中,新元素靠近栈顶,旧元素靠近栈底。栈被用在很多地方,例如编译器和内存中保存变量、方法调用等,也被用于浏览器历史记录(浏览器的返回按钮)。
基于数组的栈
我们创建一个表示栈的类,它主要包含 6 个方法。
方法名
作用
push(element)添加一个新元素到栈顶
size()返回栈中元素的个数
pop()移除栈顶元素,同时返回被移除的元素
peek()返回栈顶元素,不对栈做任何修改
isEmpty()如果栈为空就返回true,否则返回false
clear()移除栈中所有的元素
代码实现如下:
 1
 2
 3
 4
 5
 6
 7
 8
 9
10
11
12
13
14
15
16
17
18
19
20
21
22
23
24
25
26
27
28
29
class Stack {
constructor () {
this . items = [];
}
push ( element ) {
this . items . push ( element );
}
pop () {
return this . items . pop ();
}
peek () {
return this . items [ this . items . length - 1 ];
}
isEmpty () {
return this . items . length === 0 ;
}
clear () {
this . items = [];
}
size () {
return this . items . length ;
}
}
基于 JavaScript 对象的栈
我们也可以使用一个 JavaScript 对象来存储所有的栈元素,其中包含一个count属性来记录栈的大小。
 1
 2
 3
 4
 5
 6
 7
 8
 9
10
11
12
13
14
15
16
17
18
19
20
21
22
23
24
25
26
27
28
29
30
31
32
33
34
35
36
37
38
39
40
41
class Stack {
constructor () {
this . count = 0 ;
this . items = {};
}
push ( element ) {
this . items [ this . count ] = element ;
this . count ++ ;
}
size () {
return this . count ;
}
isEmpty () {
return this . count === 0 ;
}
pop () {
if ( this . isEmpty ()) {
return undefined ;
}
this . count -- ;
const result = this . items [ this . count ];
delete this . items [ this . count ];
return result ;
}
peek () {
if ( this . isEmpty ()) {
return undefined ;
}
return this . items [ this . count - 1 ];
}
clear () {
this . items = {};
this . count = 0 ;
}
}
保护数据结构内部元素
在创建别的开发者也可以使用的数据结构或对象时,我们希望保护内部的元素,只有我们暴露的方法才能修改内部结构。对于Stack类来说,要确保元素只会被添加到栈顶,而不是栈底或其他位置(如栈的中间)。我们在Stack类中声明的items和count属性并没有得到保护,因为 JavaScript 的类就是这样工作的。
执行下面代码。
1
2
3
4
const stack = new Stack ();
console . log ( Object . getOwnPropertyNames ( stack )); // {1}
console . log ( Object . keys ( stack )); // {2}
console . log ( stack . items ); // {3}
行{1}和行{2}的输出结果都是["count", "items"]。这表示count和items属性是公开的,我们可以像行{3}那样直接访问它们,并且可以对这两个属性赋予新的值。Stack类基于 ES6(ES2015)语法创建。ES6 类是基于原型的。虽然基于原型的类能节省内存空间并在扩展方面优与基于函数的类,但这种方式不能声明私有属性(变量)或方法。为了让用户只能访问我们在类中暴露的方法,下面来看看其他使用 JavaScript 来实现私有属性的方法。
下划线命名约定
一部分开发者喜欢在 JavaScript 中使用下划线命名约定(在属性名称前加一个下划线_)来标记一个属性为私有属性。
1
2
3
4
5
6
class Stack {
constructor () {
this . _items = {};
this . _count = 0 ;
}
}
这种方式只是一种约定,并不能保护数据,且只能依赖代码使用者所具备的常识。
用 ES6 的限定作用域 Symbol 实现类
ES6 新增了一种叫做Symbol的基本类型,它是不可变的,可以用作对象的属性。
1
2
3
4
5
6
7
const _items = Symbol ( 'stackItems' );
class Stack {
constructor () {
this [ _items ] = [];
}
}
上述代码声明了Symbol类型的变量_items,在类的constructor函数中初始化它的值。要访问_items需要把所有的this.items换成this[_items]。这种方式创建了一个假的私有属性,ES6 新增的Object.getOwnPropertySymbols方法能获取到类声明的所有Symbols属性。
 1
 2
 3
 4
 5
 6
 7
 8
 9
10
const stack = new Stack ();
stack . push ( 5 );
stack . push ( 8 );
let objectSymbols = Object . getOwnPropertySymbols ( stack );
console . log ( objectSymbols . length ); // 1
console . log ( objectSymbols ); // [Symbol(stackItems)]
console . log ( objectSymbols [ 0 ]); // Symbol(stackItems)
stack [ objectSymbols [ 0 ]]. push ( 1 );
stack [ objectSymbols [ 0 ]]. push ( 15 );
stack [ objectSymbols [ 0 ]]. toString (); // 1, 15
我们可以通过stack[objectSymbols[0]]获取到数组,因而进行任意数组操作。
用 ES6 的 WeakMap
WeakMap 可以确保属性是私有的,WeakMap 可以存储键值对,其中键是对象,值可以是任何数据类型。
 1
 2
 3
 4
 5
 6
 7
 8
 9
10
11
12
13
14
15
16
17
18
const items = new WeakMap ();
class Stack {
constructor () {
items . set ( this , []);
}
push ( element ) {
const s = items . get ( this );
s . push ( element );
}
pop () {
const s = items . get ( this );
const r = s . pop ();
return r ;
}
}
items在Stack类中是真正的私有属性,但这种方法使得代码的可读性不强,并且在扩展该类时无法继承私有属性。
为了避免污染全局命名空间,我们可以参考2 将整个实现封装在一个闭包中。
 1
 2
 3
 4
 5
 6
 7
 8
 9
10
11
12
13
14
15
16
17
18
19
20
21
22
23
24
25
26
27
28
29
30
31
32
33
34
35
36
37
38
39
40
41
42
43
44
45
46
47
let Stack = (() => {
let map = new WeakMap ();
let _items = [];
class Stack {
constructor (... items ) {
// let's store our items array inside the weakmap
map . set ( this , []);
// let's get the items array from map, and store it in _items for easy access elsewhere
_items = map . get ( this );
//if constructor receives any items, it should be stacked up
this . push (... items );
}
push (... items ) {
//push item to the stack
items . forEach (( item ) => _items . push ( item ));
return _items ;
}
pop ( count = 1 ) {
//pull out the topmost item (last item) from stack
return _items . splice ( - count , count );
}
peek () {
// see what's the last item in stack
return _items [ _items . length - 1 ];
}
size () {
//no. of items in stack
return _items . length ;
}
isEmpty () {
// return whether the stack is empty or not
return _items . length == 0 ;
}
toArray () {
return _items ;
}
}
return Stack ;
})();
队列和双端队列
队列和栈十分类似,但遵循的是先进先出(First In First Out, FIFO,也称为先来先服务)原则。队列在尾部添加新元素,并从首部移除元素。
队列数据结构
我们创建一个类表示队列。
1
2
3
4
5
6
7
class Queue {
constructor () {
this . count = 0 ; // {1}
this . lowestCount = 0 ; // {2}
this . items = {}; // {3}
}
}
可以使用数组作为存储队列元素的数据结构,但对象在获取元素时更加高效,因此这里使用了对象存储队列元素(行{3})。我们声明了一个count属性帮助我们控制队列的大小。此外,由于我们将要从队列前端移除元素,同样需要一个变量来帮助我们追踪第一个元素。因此,声明了一个lowestCount变量。
队列中可用的方法大致包含以下 6 个:
方法名
作用
enqueue(element)添加一个新元素到队尾
size()返回队列中元素的个数
dequeue()移除队首元素,同时返回被移除的元素
peek()返回队首元素,不对栈做任何修改
isEmpty()如果队列为空就返回true,否则返回false
clear()移除队列中所有的元素
 1
 2
 3
 4
 5
 6
 7
 8
 9
10
11
12
13
14
15
16
17
18
19
20
21
22
23
24
25
26
27
28
29
30
31
32
33
34
35
36
37
38
39
40
41
42
43
44
45
46
47
48
49
50
51
52
53
54
55
class Queue {
constructor () {
this . count = 0 ;
this . lowestCount = 0 ;
this . items = {};
}
enqueue ( element ) {
this . items [ this . count ] = element ;
this . count ++ ;
}
dequeue () {
if ( this . isEmpty ()) {
return undefined ;
}
const result = this . items [ this . lowestCount ];
delete this . items [ this . lowestCount ];
this . lowestCount ++ ;
return result ;
}
isEmpty () {
return this . size () === 0 ;
}
peek () {
if ( this . isEmpty ()) {
return undefined ;
}
return this . items [ this . lowestCount ];
}
size () {
return this . count - this . lowestCount ;
}
clear () {
this . items = {};
this . lowestCount = 0 ;
this . count = 0 ;
}
toString () {
if ( this . isEmpty ()) {
return '' ;
}
let objString = ` ${ this . items [ this . lowestCount ] } ` ;
for ( let i = this . lowestCount + 1 ; i < this . count ; i ++ ) {
objString = ` ${ objString } , ${ this . items [ i ] } ` ;
}
return objString ;
}
}
使用队列
实例化刚创建的Queue类,验证其是否为空。
1
2
const queue = new Queue ();
console . log ( queue . isEmpty ()); // true
添加一些元素:
1
2
3
queue . enqueue ( 'ABC' );
queue . enqueue ( 'CDE' );
console . log ( queue . toString ()); // ABC,CDE
移除元素:
1
queue . dequeue (); // 移除ABC
双端队列
双端队列(double-ended queue,deque)是一种允许同时从队首和队尾添加和移除元素的特殊队列。双端队列同时遵循了先进先出和后进先出原则,因此可以说它是把队列和栈结合的一种数据结构。
我们声明一个Deque类表示双端队列。
1
2
3
4
5
6
7
class Deque {
constructor () {
this . items = {};
this . count = 0 ;
this . lowestCount = 0 ;
}
}
双端队列主要包含以下方法:
方法名
作用
addFront(element)添加一个新元素到队列前端
addBack(element)添加一个新元素到队列后端(实现方法和Queue类中的enqueue方法相同)
removeFront()移除队列前端元素,同时返回被移除的元素(实现方法和Queue类中的dequeue方法相同)
removeBack()移除队列后端元素,同时返回被移除的元素(实现方法和Stack类中的pop方法相同)
peekFront()返回队列前端第一个元素(实现方法和Queue类中的peek方法相同)
peekBack()返回队列后端第一个元素(实现方法和Stack类中的peek方法相同)
clear()移除队列中所有的元素
size()返回队列中元素的个数
isEmpty()如果队列为空就返回true,否则返回false
 1
 2
 3
 4
 5
 6
 7
 8
 9
10
11
12
13
14
15
16
17
18
19
20
21
22
23
24
25
26
27
28
29
30
31
32
33
34
35
36
37
38
39
40
41
42
43
44
45
46
47
48
49
50
51
52
53
54
55
56
57
58
59
60
61
62
63
64
65
66
67
68
69
70
71
72
73
74
75
76
77
78
79
80
81
82
83
84
85
86
87
class Deque {
constructor () {
this . items = {};
this . count = 0 ;
this . lowestCount = 0 ;
}
addFront ( element ) {
if ( this . isEmpty ()) {
this . addBack ( element );
} else if ( this . lowestCount > 0 ) {
this . lowestCount -- ;
this . items [ this . lowestCount ] = element ;
} else {
for ( let i = this . count ; i > 0 ; i -- ) {
this . items [ i ] = this . items [ i - 1 ];
}
this . count ++ ;
this . lowestCount = 0 ;
this . items [ 0 ] = element ;
}
}
addBack ( element ) {
this . items [ this . count ] = element ;
this . count ++ ;
}
removeFront () {
if ( this . isEmpty ()) {
return undefined ;
}
const result = this . items [ this . lowestCount ];
delete this . items [ this . lowestCount ];
this . lowestCount ++ ;
return result ;
}
removeBack () {
if ( this . isEmpty ()) {
return undefined ;
}
this . count -- ;
const result = this . items [ this . count ];
delete this . items [ this . count ];
return result ;
}
peekFront () {
if ( this . isEmpty ()) {
return undefined ;
}
return this . items [ this . lowestCount ];
}
peekBack () {
if ( this . isEmpty ()) {
return undefined ;
}
return this . items [ this . count - 1 ];
}
isEmpty () {
return this . size () === 0 ;
}
size () {
return this . count - this . lowestCount ;
}
clear () {
this . items = {};
this . count = 0 ;
this . lowestCount = 0 ;
}
toString () {
if ( this . isEmpty ()) {
return '' ;
}
let objString = ` ${ this . items [ this . lowestCount ] } ` ;
for ( let i = this . lowestCount + 1 ; i < this . count ; i ++ ) {
objString = ` ${ objString } , ${ this . items [ i ] } ` ;
}
return objString ;
}
}
使用队列来解决问题
接下来,我们用队列来解决两个有意思的问题:击鼓传花和回文检测。
击鼓传花
击鼓传花游戏(hot potato)规则如下:孩子们围成一个圆圈,把花尽快传递给旁边的人。某一时刻传花停止,此时花在谁手中,谁就退出圆圈、结束游戏。重复这个过程,直到只剩下一个人即为胜利者。
 1
 2
 3
 4
 5
 6
 7
 8
 9
10
11
12
13
14
15
16
17
18
19
20
21
22
23
24
25
26
27
28
29
30
31
/*
elementsList为参与者名单
num为传递次数
*/
function hotPotato ( elementsList , num ) {
const queue = new Queue ();
const elimitatedList = [];
for ( elem of elementsList ) {
queue . enqueue ( elem );
}
while ( queue . size () > 1 ) {
for ( let i = 0 ; i < num ; i ++ ) {
queue . enqueue ( queue . dequeue ());
}
elimitatedList . push ( queue . dequeue ());
}
return {
elimitated : elimitatedList ,
winner : queue . dequeue (),
};
}
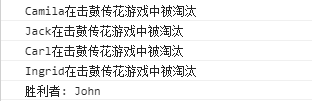
const names = [ 'John' , 'Jack' , 'Camila' , 'Ingrid' , 'Carl' ];
const result = hotPotato ( names , 7 );
result . elimitated . forEach (( name ) =>
console . log ( ` ${ name } 在击鼓传花游戏中被淘汰` )
);
console . log ( `胜利者: ${ result . winner } ` );
回文检测
回文是正反都能读通的单词、词组、数或一系列字符的序列,例如 madam 或 racecar。有很多解决这个问题的算法,我们可以将字符串反向排列并检查它和原字符串是否相同。如果两者相同,那么它就是一个回文。也可以用栈解决这个问题,但用数据结构来解决这个问题的最简单方法是使用双端队列。
 1
 2
 3
 4
 5
 6
 7
 8
 9
10
11
12
13
14
15
16
17
18
19
20
21
22
23
24
25
26
27
28
29
30
31
32
function palindromeChecker ( aString ) {
if (
aString === undefined ||
aString === null ||
( aString !== null && aString . length === 0 )
) {
return false ;
}
const deque = new Deque ();
const lowerString = aString . toLocaleLowerCase (). split ( ' ' ). join ( '' );
let isEqual = true ;
let firstChar , lastChar ;
for ( let i = 0 ; i < lowerString . length ; i ++ ) {
deque . addBack ( lowerString . charAt ( i ));
}
while ( deque . size () > 1 && isEqual ) {
firstChar = deque . removeFront ();
lastChar = deque . removeBack ();
if ( firstChar !== lastChar ) {
isEqual = false ;
}
}
return isEqual ;
}
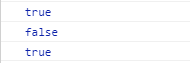
console . log ( palindromeChecker ( 'a' ));
console . log ( palindromeChecker ( 'abc cbd' ));
console . log ( palindromeChecker ( 'abc cba' ));
链表
本节我们将学习如何实现和使用链表这种动态(指的是它会按需扩容)的数据结构。
链表数据结构
要存储多个元素,数组(或列表)可能是最常用的数据结构。这种结构非常方便,提供了一个便利的[]语法来访问其元素。然而,这种数据结构有一个缺点:(在大多数语言中)数据的大小是固定的,从数组的起点或中间插入或移除项的成本很高,因为需要移动元素(JavaScript 的 Array 类的方法也是如此)。
链表存储有序(这里的有序并不是指元素间的大小关系,而是元素间存在访问次序)的元素集合,但不同于数组,链表中的元素在内存中并不是连续放置的。每个元素由一个存储元素本身的节点和一个指向下一个元素的引用(也称指针或链接)组成。下图展示了一个链表的结构。
相比于数组,链表在添加或移除元素时不需要移动其他元素。但链表需要使用指针,因此实现链表时需要额外注意。在数组中,我们可以直接访问任何位置的元素,而要想访问链表中间的一个元素,需要从起点(表头)开始迭代链表直到找到所需的元素。
创建链表
现在开始实现,以下为LinkedList类的“骨架”。
 1
 2
 3
 4
 5
 6
 7
 8
 9
10
import { defaultEquals } from '../util.js' ;
import { Node } from './models/linked-list-models.js' ;
export default class LinkedList {
constructor ( equalsFn = defaultEquals ) {
this . count = 0 ;
this . head = null ;
this . equalsFn = equalsFn ;
}
}
count属性用来存储链表中的元素数量。要比较链表中的元素是否相等,需要使用一个内部调用的函数,名为equalsFn。使用LinkedList类的开发者可以自行传入用于比较两个 JavaScript 对象或值是否相等的自定义函数。如果没有传入这个自定义函数,该数据结构将使用定义在util.js中的defaultEquals函数作为默认的相等性比较函数。defaultEquals函数的定义如下。
1
2
3
export function defaultEquals ( a , b ) {
return a === b ;
}
由于该数据结构是动态的,我们将第一个元素的引用保存下来,因此用一个叫head的元素保存引用。我们使用Node类表示我们想要添加到链表中的项,它包含一个element属性,表示要加入链表元素的值;以及一个next属性,该属性是指向链表中下一个元素的指针。Node类的声明位于models/linked-list-models.js文件中,其代码如下:
1
2
3
4
5
6
export class Node {
constructor ( element ) {
this . element = element ;
this . next = null ;
}
}
LinkkedList类中主要包含的方法如下:
方法名
作用
push(element)向链表尾部添加一个新元素
insert(element, position)向链表的特定位置插入一个新元素
size()返回链表中元素的个数
remove(element)从链表中移除一个元素
getElementAt(index)返回链表中特定位置的元素。如果链表中不存在这样的元素,则返回null
indexOf(element)返回元素在链表中的索引。如果链表中没有该元素则返回-1
removeAt(position)从链表的特定位置移除一个元素
isEmpty()如果链表中不包含任何元素,返回true,如果链表长度大于 0 则返回false
toString()返回表示整个链表的字符串
  1
  2
  3
  4
  5
  6
  7
  8
  9
 10
 11
 12
 13
 14
 15
 16
 17
 18
 19
 20
 21
 22
 23
 24
 25
 26
 27
 28
 29
 30
 31
 32
 33
 34
 35
 36
 37
 38
 39
 40
 41
 42
 43
 44
 45
 46
 47
 48
 49
 50
 51
 52
 53
 54
 55
 56
 57
 58
 59
 60
 61
 62
 63
 64
 65
 66
 67
 68
 69
 70
 71
 72
 73
 74
 75
 76
 77
 78
 79
 80
 81
 82
 83
 84
 85
 86
 87
 88
 89
 90
 91
 92
 93
 94
 95
 96
 97
 98
 99
100
101
102
103
104
105
106
107
108
109
110
111
112
113
114
115
116
import { defaultEquals } from '../util.js' ;
import { Node } from './models/linked-list-models.js' ;
export default class LinkedList {
constructor ( equalsFn = defaultEquals ) {
this . count = 0 ;
this . head = null ;
this . equalsFn = equalsFn ;
}
push ( element ) {
const node = new Node ( element );
if ( this . head === null ) {
this . head = node ;
} else {
let current = this . head ;
while ( current . next !== null ) {
// 获得最后一项
current = current . next ;
}
// 将其next赋为新元素,建立链接
current . next = node ;
}
this . count ++ ;
}
getElementAt ( index ) {
if ( index >= 0 && index < this . count ) {
let node = this . head ;
for ( let i = 0 ; i < index && node !== null ; i ++ ) {
node = node . next ;
}
return node ;
}
return null ;
}
removeAt ( index ) {
// 检查越界值
if ( index >= 0 && index < this . count ) {
let current = this . head ;
// 移除第一项
if ( index === 0 ) {
this . head = current . next ;
} else {
const previous = this . getElementAt ( index - 1 );
current = previous . next ;
previous . next = current . next ;
}
this . count -- ;
return current . element ;
}
return null ;
}
insert ( element , index ) {
if ( index >= 0 && index <= this . count ) {
const node = new Node ( element );
if ( index === 0 ) {
const current = this . head ;
node . next = current ;
this . head = node ;
} else {
const previous = this . getElementAt ( index - 1 );
const current = previous . next ;
node . next = current ;
previous . next = node ;
}
this . count ++ ; // 更新链表长度
return true ;
}
return false ;
}
indexOf ( element ) {
let current = this . head ;
for ( let i = 0 ; i < this . count && current !== null ; i ++ ) {
if ( this . equalsFn ( element , current . element )) {
return i ;
}
current = current . next ;
}
return - 1 ;
}
remove ( element ) {
const index = this . indexOf ( element );
return this . removeAt ( index );
}
size () {
return this . count ;
}
isEmpty () {
return this . size () === 0 ;
}
getHead () {
return this . head ;
}
toString () {
if ( this . head === null ) {
return '' ;
}
let objString = ` ${ this . head . element } ` ;
let current = this . head . next ;
for ( let i = 1 ; i < this . size () && current !== null ; i ++ ) {
objString = ` ${ objString } , ${ current . element } ` ;
current = current . next ;
}
return objString ;
}
}
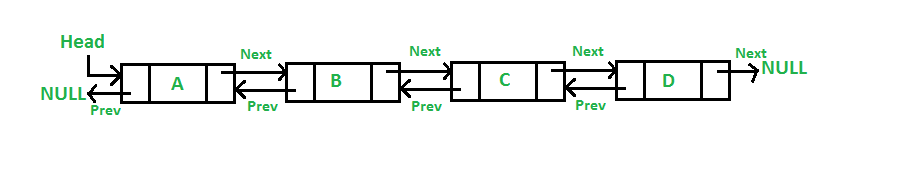
双向链表
双向链表和普通链表的区别在于,普通链表中,一个节点只有链向下一个节点的链接;而在双向链表中,链接是双向的:一个链向下一个元素,另一个链向前一个元素。
先从实现DoublyLinkedList类开始。
 1
 2
 3
 4
 5
 6
 7
 8
 9
10
11
12
13
14
15
16
17
import { defaultEquals } from '../util.js' ;
import { Node } from './models/linked-list-models.js' ;
import LinkedList from './linked-list.js' ;
class DoublyNode extends Node {
constructor ( element , next , prev ) {
super ( element , next );
this . prev = prev ;
}
}
class DoublyLinkedList extends LinkedList {
constructor ( equalsFn = defaultEquals ) {
super ( equalsFn );
this . tail = null ;
}
}
由于双向链表中的节点中包含链向前一个元素的指针,以及表尾指针,我们将insert方法和removeAt方法改为如下形式:
 1
 2
 3
 4
 5
 6
 7
 8
 9
10
11
12
13
14
15
16
17
18
19
20
21
22
23
24
25
26
27
28
29
30
31
32
33
34
35
36
37
38
39
40
41
42
43
44
45
46
47
48
49
50
51
52
53
54
55
56
57
58
59
60
61
62
63
64
65
66
67
68
69
70
71
72
73
74
75
76
import { defaultEquals } from '../util.js' ;
import { Node } from './models/linked-list-models.js' ;
import LinkedList from './linked-list.js' ;
class DoublyNode extends Node {
constructor ( element , next , prev ) {
super ( element , next );
this . prev = prev ;
}
}
class DoublyLinkedList extends LinkedList {
constructor ( equalsFn = defaultEquals ) {
super ( equalsFn );
this . tail = null ;
}
insert ( element , index ) {
if ( index >= 0 && index < this . count ) {
const node = new DoublyNode ( element );
let current = this . head ;
if ( index === 0 ) {
if ( this . head === null ) {
this . head = node ;
this . tail = node ;
} else {
node . next = this . head ;
current . prev = node ;
this . head = node ;
}
} else if ( index === this . count ) {
// 最后一项
current = this . tail ;
current . next = node ;
node . prev = current ;
this . tail = node ;
} else {
const previous = this . getElementAt ( index - 1 );
current = previous . next ;
node . next = current ;
previous . next = node ;
current . prev = node ;
node . prev = previous ;
}
this . count ++ ;
return true ;
}
return false ;
}
removeAt ( index ) {
if ( index >= 0 && index < this . count ) {
let current = this . head ;
if ( index === 0 ) {
this . head = current . next ;
if ( this . count === 1 ) {
this . tail = null ;
} else {
this . head . prev = null ;
}
} else if ( index === this . count - 1 ) {
current = this . tail ;
this . tail = current . prev ;
this . tail . next = null ;
} else {
current = this . getElementAt ( index );
const previous = current . prev ;
previous . next = current . next ;
current . next . prev = previous ;
}
this . count -- ;
return current . element ;
}
return null ;
}
}
循环链表
循环链表可以像链表一样只有单向引用,也可以像双向链表一样有双向引用。循环链表和链表之间唯一的区别在于,最后一个元素指向下一个元素的指针不是null,而是指向第一个元素(head)。
 1
 2
 3
 4
 5
 6
 7
 8
 9
10
11
12
13
14
15
16
17
18
19
20
21
22
23
24
25
26
27
28
29
30
31
32
33
34
35
36
37
38
39
40
41
42
43
44
45
46
47
48
49
50
51
52
53
54
55
56
57
import { defaultEquals } from '../util.js' ;
import LinkedList from './linked-list.js' ;
class CircularLinkedList extends LinkedList {
constructor ( equalsFn = defaultEquals ) {
super ( equalsFn );
}
insert ( element , index ) {
if ( index >= 0 && index <= this . count ) {
const node = new Node ( element );
let current = this . head ;
if ( index === 0 ) {
if ( this . head === null ) {
this . head = node ;
node . next = this . head ;
} else {
node . next = current ;
current = this . getElementAt ( this . size ());
this . head = node ;
current . next = this . head ;
}
} else {
const previous = this . getElementAt ( index - 1 );
node . next = previous . next ;
previous . next = node ;
}
this . count ++ ;
return true ;
}
return false ;
}
removeAt ( index ) {
if ( index >= 0 && index < this . count ) {
let current = this . head ;
if ( index === 0 ) {
if ( this . size () === 1 ) {
this . head = null ;
} else {
const removed = this . head ();
current = this . getElementAt ( this . size ());
this . head = this . head . next ;
current . next = this . head ;
current = removed ;
}
} else {
const previous = this . getElementAt ( index - 1 );
current = previous . next ;
previous . next = current . next ;
}
this . count -- ;
return current . element ;
}
return null ;
}
}
有序链表
有序链表是指保持元素有序的链表结构。除了使用排序算法之外,我们还可以将元素插入到正确的位置来保证链表的有序性。
 1
 2
 3
 4
 5
 6
 7
 8
 9
10
11
12
13
14
15
16
17
18
19
20
21
22
23
24
25
26
27
28
29
30
31
32
33
34
35
36
37
38
39
40
41
42
import LinkedList from './linked-list.js' ;
import { defaultEquals } from '../util.js' ;
const Compare = {
LESS_THAN : - 1 ,
BIGGER_THAN : 1 ,
};
function defaultCompare ( a , b ) {
if ( a === b ) {
return 0 ;
}
return a < b ? Compare . LESS_THAN : Compare . BIGGER_THAN ;
}
class SortedLinkedList extends LinkedList {
constructor ( equalsFn = defaultEquals , compareFn = defaultCompare ) {
super ( equalsFn );
this . compareFn = compareFn ;
}
insert ( element , index = 0 ) {
if ( this . isEmpty ()) {
return super . insert ( element , 0 );
}
const pos = this . getIndexNextSortedElement ( element );
return super . insert ( element , pos );
}
getIndexNextSortedElement ( element ) {
let current = this . head ;
let i = 0 ;
for (; i < this . size () && current ; i ++ ) {
const comp = this . compareFn ( element , current . element );
if ( comp === Compare . LESS_THAN ) {
return i ;
}
current = current . next ;
}
return i ;
}
}
StackLinkedList 类
我们可以使用LinkedList类及其变种作为内部的数据结构来创建其他数据结构,例如栈、队列和双向队列。本节,我们将学习怎样使用链表创建栈数据结构。
 1
 2
 3
 4
 5
 6
 7
 8
 9
10
11
12
13
14
15
16
17
18
19
20
21
22
23
24
25
26
27
28
29
30
31
32
33
34
35
36
37
import LinkedList from './linked-list.js' ;
class StackLinkedList {
constructor () {
this . items = new LinkedList ();
}
push ( element ) {
this . items . insert ( element , 0 );
}
isEmpty () {
return this . items . isEmpty ();
}
size () {
return this . items . size ();
}
peek () {
if ( this . isEmpty ()) {
return undefined ;
}
return this . items . getElementAt ( 0 ). element ;
}
toString () {
return this . items . toString ();
}
pop () {
if ( this . isEmpty ()) {
return undefined ;
}
return this . items . removeAt ( 0 );
}
}
集合
本节我们将学习集合,这是一种不允许值重复的数据结构。
创建集合类
我们先声明Set类。
1
2
3
4
5
class Set {
constructor () {
this . items = {};
}
}
Set类中主要包含以下方法:
方法名
作用
add(element)向集合添加一个新元素
delete(element)从集合移除一个元素
has(element)如果元素在集合中,返回true,否则返回false
clear()移除集合中的所有元素
size()返回集合中所包含元素的数量
values()返回一个包含集合中所有元素的数组
 1
 2
 3
 4
 5
 6
 7
 8
 9
10
11
12
13
14
15
16
17
18
19
20
21
22
23
24
25
26
27
28
29
30
31
32
33
34
35
36
37
class Set {
constructor () {
this . items = {};
}
has ( element ) {
return Object . prototype . hasOwnProperty . call ( this . items , element );
}
add ( element ) {
if ( ! this . has ( element )) {
this . items [ element ] = element ;
return true ;
}
return false ;
}
delete ( element ) {
if ( this . has ( element )) {
delete this . items [ element ];
return true ;
}
return false ;
}
clear () {
this . items = {};
}
size () {
return Object . keys ( this . items ). length ;
}
values () {
return Object . values ( this . items );
}
}
集合运算
并集
对于给定的两个集合,返回一个包含两个集合中所有元素的新集合。
1
2
3
4
5
6
union ( otherSet ){
const unionSet = new Set ();
this . values (). forEach ( value => unionSet . add ( value ));
otherSet . values (). forEach ( value => unionSet . add ( value ));
return unionSet ;
}
交集
对于给定的两个集合,返回一个包含两个集合中共有元素的新集合。
 1
 2
 3
 4
 5
 6
 7
 8
 9
10
intersection ( otherSet ){
const intersectionSet = new Set ();
this . values (). forEach ( value => {
if ( otherSet . has ( value )) {
intersectionSet . add ( value );
}
});
return intersectionSet ;
}
差集
对于给定的两个集合,返回一个包含所有存在于第一个集合且不存在于第二个集合的元素的新集合。
1
2
3
4
5
6
7
8
9
difference ( otherSet ){
const differenceSet = new Set ();
this . values (). forEach ( value => {
if ( ! otherSet . has ( value )){
differenceSet . add ( value );
}
});
return differenceSet ;
}
子集
验证一个给定集合是否是另一个集合的子集。
 1
 2
 3
 4
 5
 6
 7
 8
 9
10
11
12
13
14
15
isSubsetOf ( otherSet ){
if ( this . size () > otherSet . size ()){
return false ;
}
let isSubset = true ;
this . values (). forEach ( value =>{
if ( ! otherSet . has ( value )){
isSubset = false ;
return false ;
}
return true ;
});
return isSubset ;
}
ES6——Set 类
ES6 新增了Set类作为 JavaScript API 的一部分。而 ES6 原生的Set并没有实现并集、交集、差集、子集等数学运算。但是,如果有需要的话,我们也可以模拟。
我们使用以下两个集合作为示例:
1
2
3
4
5
6
7
8
9
const setA = new Set ();
setA . add ( 1 );
setA . add ( 2 );
setA . add ( 3 );
const setB = new Set ();
setB . add ( 2 );
setB . add ( 3 );
setB . add ( 4 );
模拟并集运算
我们创建一个名为union的函数来返回包含setA和setB中所有元素的集合。
1
2
3
4
5
6
const union = ( setA , setB ) => {
const unionAB = new Set ();
setA . forEach (( value ) => unionAB . add ( value ));
setB . forEach (( value ) => unionAB . add ( value ));
return unionAB ;
};
模拟交集运算
创建一个名为intersection的函数来返回setA和setB的共有元素集合。
1
2
3
4
5
6
7
8
9
const intersection = ( setA , setB ) => {
const intersectionAB = new Set ();
setA . forEach (( value ) => {
if ( setB . has ( value )) {
intersectionAB . add ( value );
}
});
return intersectionAB ;
};
模拟差集运算
创建一个名为difference的函数进行集合差集运算。
1
2
3
4
5
6
7
8
9
const difference = ( setA , setB ) => {
const differenceAB = new Set ();
setA . forEach (( value ) => {
if ( ! setB . has ( value )) {
differenceAB . add ( value );
}
});
return differenceAB ;
};
使用扩展运算符
扩展运算符号可以让并集、交集和差集的运算更加简便。整个过程包含三个步骤:
将集合转换为数组
执行需要的操作
将结果转化回集合
用扩展运算符的并集运算如下:
1
new Set ([... setA , ... setB ]);
ES6 的Set类支持向构造函数传入一个数组来初始化集合,我们对setA使用扩展运算符(...setA)会将其值转化为一个数组(展开它的值),对setB进行同样的操作。因此,上述代码和new Set([1,2,3,2,3,4])是一样的。
交集运算如下:
1
[... setA ]. filter (( item ) => setB . has ( item ));
最后,差集运算如下:
1
[... setA ]. filter (( item ) => ! setB . has ( item ));
我们会学习使用字典和散列表来存储唯一值。在集合中,我们感兴趣的是每个值本身,并把它当作主要元素。在字典(或映射)中,我们用[key, value]对的形式来存储数据。在散列表中也是一样(也是以[key, value]对的形式来存储数据),但这两种数据结构的实现方法略有不同。
字典和散列表
字典
字典中的key是用来查询特定元素,字典也称为映射、符号表或关联数组。
创建字典类
与Set类类似,ES6 同样包含一个Map类的实现,即我们所说的字典。我们将要实现的类将以 ES6 中Map类的实现为基础。以下为Dictionary类的定义:
1
2
3
4
5
6
7
8
import { defaultToString } from './util.js' ;
export default class Dictionary {
constructor ( toStrFn = defaultToString ) {
this . toStrFn = toStrFn ;
this . table = {};
}
}
与Set类类似,我们将在一个Object的实例而不是数组中存储字典中的元素,将[key, value]保存为table[key] = {key, value}。在字典中,理想情况是用字符串作为键名,值可以是任何类型(从数、字符串等原始类型,到复杂的对象)。但由于 JavaScript 不是强类型的语言,并不能保证键一定是字符串。我们需要把所有作为键名传入的对象转化为字符串,使得从Dictionary类中搜索和获取值更简单。我们在util.js文件中定义了名为defaultToString的函数将key转化为字符串。
 1
 2
 3
 4
 5
 6
 7
 8
 9
10
export function defaultToString ( item ) {
if ( item === null ) {
return 'NULL' ;
} else if ( item === undefined ) {
return 'UNDEFINED' ;
} else if ( typeof item === 'string' || item instanceof String ) {
return ` ${ item } ` ;
}
return item . toString ();
}
如果键(item)为一个字符串,那么我们直接返回它,否则要调用item的toString方法。
字典类中的主要方法如下:
方法名
作用
set(key, value)向字典中添加新元素。如果key已经存在,那么已存在的value会被新的值覆盖
remove(key)通过使用键值作为参数来从字典中移除键值对应的数据值
hasKey(key)如果键值存在于字典中,返回true,否则返回false
get(key)通过以键值作为参数查找对应的数据值并返回
size()返回字典所包含值的数量
clear()删除字典中的所有值
isEmpty()字典为空返回true,否则返回false
keys()将字典中所包含的所有键名以数组形式返回
values()将字典中所包含的所有数据值以数组形式返回
keyValues()将字典中所有[key, value]对返回
forEach(callbackFn)迭代字典中所有的键值对。callbakcFn有两个参数:key和value。该方法可以在回到函数返回false时被中止
 1
 2
 3
 4
 5
 6
 7
 8
 9
10
11
12
13
14
15
16
17
18
19
20
21
22
23
24
25
26
27
28
29
30
31
32
33
34
35
36
37
38
39
40
41
42
43
44
45
46
47
48
49
50
51
52
53
54
55
56
57
58
59
60
61
62
63
64
65
66
67
68
69
70
71
72
73
74
75
76
77
78
79
80
81
82
83
84
85
86
87
88
89
90
91
import { defaultToString } from './util.js' ;
class ValuePair {
constructor ( key , value ) {
this . key = key ;
this . value = value ;
}
toString () {
return `[# ${ this . key } , ${ this . value } ]` ;
}
}
export default class Dictionary {
constructor ( toStrFn = defaultToString ) {
this . toStrFn = toStrFn ;
this . table = {};
}
hasKey ( key ) {
return this . table [ this . toStrFn ( key )] != null ;
}
set ( key , value ) {
if ( key != null && value != null ) {
const tableKey = this . toStrFn ( key );
this . table [ tableKey ] = new ValuePair ( key , value );
return true ;
}
return false ;
}
remove ( key ) {
if ( this . hasKey ( key )) {
delete this . table [ this . toStrFn ( key )];
return true ;
}
return false ;
}
get ( key ) {
const valuePair = this . table [ this . toStrFn ( key )];
return valuePair == null ? undefined : valuePair . value ;
}
keyValues () {
return Object . values ( this . table );
}
keys () {
return this . keyValues (). map (( valuePair ) => valuePair . key );
}
values () {
return this . keyValues (). map (( valuePair ) => valuePair . value );
}
forEach ( callbackFn ) {
const valuePairs = this . keyValues ();
for ( let i = 0 ; i < valuePairs . length ; i ++ ) {
const result = callbackFn ( valuePairs [ i ]. key , valuePairs [ i ]. value );
if ( result === false ) {
break ;
}
}
}
size () {
return Object . keys ( this . table ). length ;
}
isEmpty () {
return this . size () === 0 ;
}
clear () {
this . table = {};
}
toString () {
if ( this . isEmpty ()) {
return '' ;
}
const valuePairs = this . keyValues ();
let objString = ` ${ valuePairs [ 0 ]. toString () } ` ;
for ( let i = 1 ; i < valuePairs . length ; i ++ ) {
objString = ` ${ objString } , ${ valuePairs [ i ]. toString () } ` ;
}
return objString ;
}
}
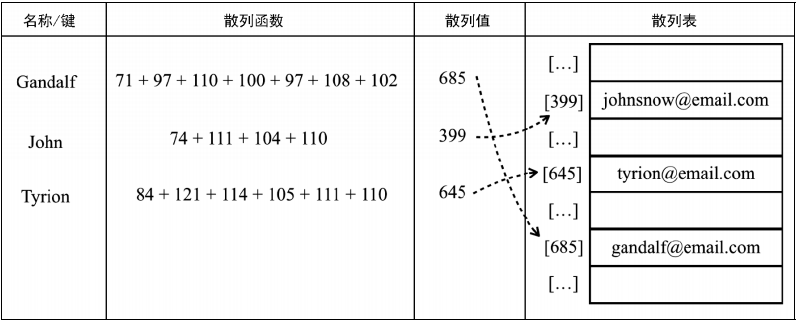
散列表
本节我们将学习散列表。散列算法的作用是尽可能快地在数据结构中找到一个值。给定一个键值,散列函数可以返回其数据值在表中的地址。最常见的散列函数为lose lose散列函数,它简单地将每个键值中的每个字母的 ASCII 值相加,如下图所示:
创建散列表
我们使用一个对象来表示该数据结构,和Dictionary类一样。
 1
 2
 3
 4
 5
 6
 7
 8
 9
10
11
12
13
14
15
16
17
18
19
20
21
22
23
24
25
26
27
28
29
30
31
32
33
34
35
36
37
38
39
40
41
42
43
44
45
46
47
48
49
50
51
52
53
54
55
56
57
58
59
import { defaultToString } from './util.js' ;
class ValuePair {
constructor ( key , value ) {
this . key = key ;
this . value = value ;
}
toString () {
return `[# ${ this . key } , ${ this . value } ]` ;
}
}
export default class HashTable {
constructor ( toStrFn = defaultToString ) {
this . toStrFn = toStrFn ;
this . table = {};
}
loseloseHashCode ( key ) {
if ( typeof key === 'number' ) {
return key ;
}
const tableKey = this . toStrFn ( key );
let hash = 0 ;
for ( let i = 0 ; i < tableKey . length ; i ++ ) {
hash += tableKey . charCodeAt ( i );
}
return hash % 37 ;
}
hashCode ( key ) {
return this . loseloseHashCode ( key );
}
put ( key , value ) {
if ( key != null && value != null ) {
const position = this . hashCode ( key );
this . table [ position ] = new ValuePair ( key , value );
return true ;
}
return false ;
}
get ( key ) {
const valuePair = this . table [ this . hashCode ( key )];
return valuePair == null ? undefined : valuePair . value ;
}
remove ( key ) {
const hash = this . hashCode ( key );
const valuePair = this . table [ hash ];
if ( valuePair != null ) {
delete this . table [ hash ];
return true ;
}
return false ;
}
}
处理散列表中的冲突
一些键有时会有相同的散列值,不同的键在散列表中对应相同位置的时候,我们称其为冲突。处理冲突有多种方法:分离链接、线性探查和双散列法。
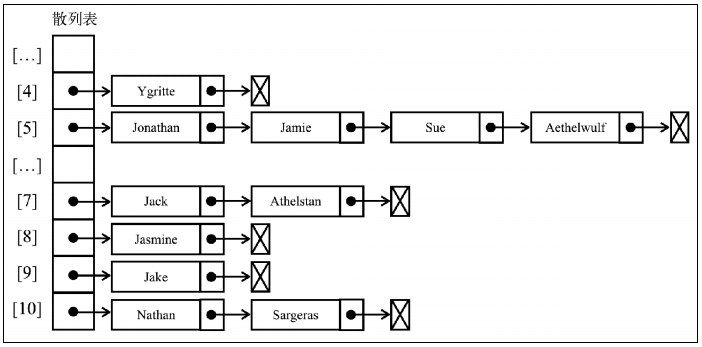
分离链接
分离链接法为散列表的每一个位置创建一个链表并将元素存储其中,它是解决冲突最简单的方法,但在HashTable实例外还需要额外的存储空间。
对于分离链接和线性探查来说,只需重写三个方法:put、get和remove。HashTableSeparateChaining类的定义如下:
 1
 2
 3
 4
 5
 6
 7
 8
 9
10
11
12
13
14
15
16
17
18
19
20
21
22
23
24
25
26
27
28
29
30
31
32
33
34
35
36
37
38
39
40
41
42
43
44
45
46
47
48
49
50
51
52
53
54
55
56
57
58
59
60
61
62
63
64
65
66
67
68
69
70
71
72
73
74
75
76
77
78
79
80
81
82
import { defaultToString } from './util.js' ;
import LinkedList from './linked-list.js' ;
class ValuePair {
constructor ( key , value ) {
this . key = key ;
this . value = value ;
}
toString () {
return `[# ${ this . key } , ${ this . value } ]` ;
}
}
class HashTableSeparateChaining {
constructor ( toStrFn = defaultToString ) {
this . toStrFn = toStrFn ;
this . table = {};
}
loseloseHashCode ( key ) {
if ( typeof key === 'number' ) {
return key ;
}
const tableKey = this . toStrFn ( key );
let hash = 0 ;
for ( let i = 0 ; i < tableKey . length ; i ++ ) {
hash += tableKey . charCodeAt ( i );
}
return hash % 37 ;
}
hashCode ( key ) {
return this . loseloseHashCode ( key );
}
put ( key , value ) {
if ( key != null && value != null ) {
const position = this . hashCode ( key );
if ( this . table [ position ] == null ) {
this . table [ position ] = new LinkedList ();
}
this . table [ position ]. push ( new ValuePair ( key , value ));
return true ;
}
return false ;
}
get ( key ) {
const position = this . hashCode ( key );
const linkedList = this . table [ position ];
if ( linkedList != null && ! linkedList . isEmpty ()) {
let current = linkedList . getHead ();
while ( current != null ) {
if ( current . element . key === key ) {
return current . element . value ;
}
current = current . next ;
}
}
return undefined ;
}
remove ( key ) {
const position = this . hashCode ( key );
const linkedList = this . table [ position ];
if ( linkedList != null && ! linkedList . isEmpty ()) {
let current = linkedList . getHead ();
while ( current != null ) {
if ( current . element . key === key ) {
linkedList . remove ( current . element );
if ( ! linkedList . isEmpty ()) {
delete this . table [ position ];
}
return true ;
}
current = current . next ;
}
}
return false ;
}
}
重写了这三个方法后,我们拥有了一个使用分离链表来处理冲突的HashTableSeparateChaining类。
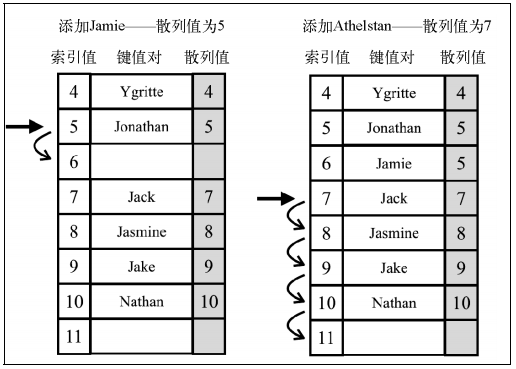
线性探查
另一种解决冲突的方法是线性探查,当想向表中某个位置添加一个新元素的时候,如果索引为position的位置已经被占据,就尝试position+1的位置。如果position+1的位置也被占据了,就尝试position+2的位置,以此类推,直到在散列表中找到一个空闲位置。下图展现了这个过程:
  1
  2
  3
  4
  5
  6
  7
  8
  9
 10
 11
 12
 13
 14
 15
 16
 17
 18
 19
 20
 21
 22
 23
 24
 25
 26
 27
 28
 29
 30
 31
 32
 33
 34
 35
 36
 37
 38
 39
 40
 41
 42
 43
 44
 45
 46
 47
 48
 49
 50
 51
 52
 53
 54
 55
 56
 57
 58
 59
 60
 61
 62
 63
 64
 65
 66
 67
 68
 69
 70
 71
 72
 73
 74
 75
 76
 77
 78
 79
 80
 81
 82
 83
 84
 85
 86
 87
 88
 89
 90
 91
 92
 93
 94
 95
 96
 97
 98
 99
100
101
102
103
104
import { defaultToString } from './util.js' ;
class ValuePair {
constructor ( key , value ) {
this . key = key ;
this . value = value ;
}
toString () {
return `[# ${ this . key } , ${ this . value } ]` ;
}
}
export default class HashTableLinearProbing {
constructor ( toStrFn = defaultToString ) {
this . toStrFn = toStrFn ;
this . table = {};
}
loseloseHashCode ( key ) {
if ( typeof key === 'number' ) {
return key ;
}
const tableKey = this . toStrFn ( key );
let hash = 0 ;
for ( let i = 0 ; i < tableKey . length ; i ++ ) {
hash += tableKey . charCodeAt ( i );
}
return hash % 37 ;
}
hashCode ( key ) {
return this . loseloseHashCode ( key );
}
put ( key , value ) {
if ( key != null && value != null ) {
const position = this . hashCode ( key );
if ( this . table [ position ] == null ) {
this . table [ position ] = new ValuePair ( key , value );
} else {
let index = position + 1 ;
while ( this . table [ index ] != null ) {
index ++ ;
}
this . table [ index ] = new ValuePair ( key , value );
}
return true ;
}
return false ;
}
get ( key ) {
const position = this . hashCode ( key );
if ( this . table [ position ] != null ) {
if ( this . table [ position ]. key === key ) {
return this . table [ position ]. value ;
}
let index = position + 1 ;
while ( this . table [ index ] != null && this . table [ index ]. key !== key ) {
index ++ ;
}
if ( this . table [ index ] != null && this . table [ index ]. key === key ) {
return this . table [ index ]. value ;
}
}
return undefined ;
}
verifyRemoveSideEffect ( key , removedPosition ) {
const hash = this . hashCode ( key );
let index = removedPosition + 1 ;
while ( this . table [ index ] != null ) {
const posHash = this . hashCode ( this . table [ index ]. key );
if ( posHash <= hash || posHash <= removedPosition ) {
this . table [ removedPosition ] = this . table [ index ];
delete this . table [ index ];
removedPosition = index ;
}
index ++ ;
}
}
remove ( key ) {
const position = this . hashCode ( key );
if ( this . table [ position ] != null ) {
if ( this . table [ position ]. key === key ) {
delete this . table [ position ];
this . verifyRemoveSideEffect ( key , position );
return true ;
}
let index = position + 1 ;
while ( this . table [ index ] != null && this . table [ index ]. key !== key ) {
index ++ ;
}
if ( this . table [ index ] != null && this . table [ index ]. key === key ) {
delete this . table [ index ];
this . verifyRemoveSideEffect ( key , index );
return true ;
}
}
return false ;
}
}
更好的散列函数
lose lose散列函数并不是一个表现良好的散列函数,它会产生很多冲突。一个表现良好的散列函数由几个方面构成:插入和检索元素的时间,以及较低冲突可能性。一个比lose lose更好的散列函数是djb2。
1
2
3
4
5
6
7
8
djb2HashCode ( key ){
const tableKey = this . toStrFn ( key );
let hash = 3851 ;
for ( let i = 0 ; i < tableKey . length ; i ++ ){
hash = ( hash * 33 ) + tableKey . charCodeAt ( i );
}
return hash % 1013 ;
}
递归
理解递归
递归是一种解决问题的方法,它从解决问题的各个小部分开始,直到解决最初的大问题。递归通常涉及函数调用自身。递归函数是像下面这样能够直接调用自身的方法或函数。
1
2
3
function recursiveFunction ( someParam ) {
recursiveFunction ( someParam );
}
或者是像下面这样间接调用自身的函数。
1
2
3
4
5
6
7
function recursiveFunction1 ( someParam ) {
recursiveFunction2 ( someParam );
}
function recursiveFunction2 ( someParam ) {
recursiveFunction1 ( someParam );
}
如果现在执行recursiveFunction,它会一直执行。因此,每个递归函数都必须有基线条件,即一个不再递归调用的条件(停止点),以防止无限递归。
计算阶乘
数n的阶乘定义为n!,表示从1到n的整数的乘积。
我们可以用迭代的方式计算一个数的阶乘:
1
2
3
4
5
6
7
8
function factorialIterative ( number ) {
if ( number < 0 ) return undefined ;
let total = 1 ;
for ( let n = number ; n > 1 ; n -- ) {
total *= n ;
}
return total ;
}
也可以用递归的方式:
1
2
3
4
5
6
7
function factorial ( n ) {
if ( n === 1 || n === 0 ) {
// 基线条件
return 1 ;
}
return n * factorial ( n - 1 ); // 递归调用
}
斐波那契数列
斐波那契数列的定义如下:
位置 0 的斐波那契数是 0
位置 1 和 2 的斐波那契数是 1
位置n(n > 2)的斐波那契数是位置n-1斐波那契数加上位置n-2斐波那契数
我们用迭代的方法实现fibonacci函数:
 1
 2
 3
 4
 5
 6
 7
 8
 9
10
11
12
13
14
function fibonacciIterative ( n ) {
if ( n < 1 ) return 0 ;
if ( n <= 2 ) return 1 ;
let fibNMinus2 = 0 ;
let fibNMinus1 = 1 ;
let fibN = n ;
for ( let i = 2 ; i <= n ; i ++ ) {
fibN = fibNMinus1 + fibNMinus2 ;
fibNMinus2 = fibNMinus1 ;
fibNMinus1 = fibN ;
}
return fibN ;
}
递归求斐波那契数如下:
1
2
3
4
5
function fibonacci ( n ) {
if ( n < 1 ) return 0 ;
if ( n <= 2 ) return 1 ;
return fibonacci ( n - 1 ) + fibonacci ( n - 2 );
}
还可以使用记忆化技术解决求斐波那契数,记忆化是一种保存前一个结果的值的优化技术,类似于缓存。如果分析计算fibonacci(5)时的调用就会发现,fibnacci(3)被计算了两次,因此可以将它的结果存储下来,这样当需要再次计算它的时候,我们就可以直接使用其结果。
1
2
3
4
5
6
7
8
function fibonacciMemorization ( n ) {
const memo = [ 0 , 1 ];
const fibonacci = ( n ) => {
if ( memo [ n ] != null ) return memo [ n ];
return ( memo [ n ] = fibonacci ( n - 1 ) + fibonacci ( n - 2 ));
};
return fibonacci ;
}
为什么要用递归?
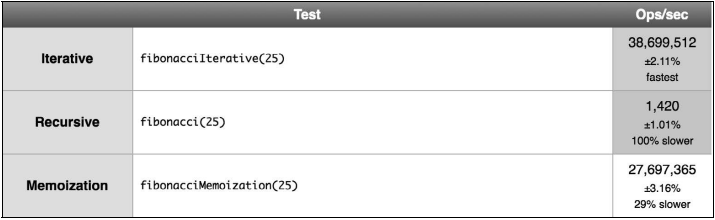
我们运行一个检测程序来测试三个不同的fibonacci函数。
迭代的版本比递归版本快很多。但递归版本更容易理解,需要的代码通常也更少。另外,对一些算法来说,迭代的解法可能不可用,而且有了尾调用优化,递归的多余消耗甚至可能被消除。所以,我们经常使用递归,因此用它来解决问题会更简单。
推荐
关于数组
JavaScript Object Prototypes: https://www.w3schools.com/js/js_object_prototypes.asp
JavaScript Array Reference: https://www.w3schools.com/jsref/jsref_obj_array.asp
20+ Array Coding Problems and Questions from Programming Interviews: https://medium.com/javarevisited/20-array-coding-problems-and-questions-from-programming-interviews-869b475b9121
Huge collection of Array Interview Questions: https://medium.com/techie-delight/huge-collection-of-array-interview-questions-e87ac7c34e62
Array Data Structure: https://www.geeksforgeeks.org/array-data-structure/
Algorithm Interview Questions and Answers (JS):https://shinjukudev.medium.com/algorithm-interview-questions-and-answers-js-c44f0872b9b2
关于栈
WeakMap: https://developer.mozilla.org/en-US/docs/Web/JavaScript/Reference/Global_Objects/WeakMap
JavaScript classes: https://www.w3schools.com/js/js_class_intro.asp
Self-Invoking Functions: https://www.w3schools.com/js/js_function_definition.asp
JavaScript Closures: https://www.w3schools.com/js/js_function_closures.asp
What is global namespace pollution in JavaScript?: https://www.tutorialspoint.com/what-is-global-namespace-pollution-in-javascript
How to avoid namespace pollution in JavaScript?: https://www.tutorialspoint.com/how-to-avoid-namespace-pollution-in-javascript
Stack Data Structure: Practice Problems and Interview Questions: https://medium.com/techie-delight/stack-data-structure-practice-problems-and-interview-questions-9f08a35a7f19
Stack Data Structure: https://www.geeksforgeeks.org/stack-data-structure/
Leetcode: https://leetcode-cn.com/tag/stack/problemset/
关于队列和双端队列
Types of Queues: https://www.programiz.com/dsa/types-of-queue
JavaScript String Reference: https://www.w3schools.com/jsref/jsref_obj_string.asp
Tasks, microtasks, queues and schedules: https://jakearchibald.com/2015/tasks-microtasks-queues-and-schedules/
Queue Data Structure: Practice Problems and Interview Questions: https://medium.com/techie-delight/queue-data-structure-practice-problems-and-interview-questions-f459bf0578db
Queue Data Structure: https://www.geeksforgeeks.org/queue-data-structure/
关于链表
JavaScript — Null vs. Undefined: https://codeburst.io/javascript-null-vs-undefined-20f955215a2
Export and Import: https://javascript.info/import-export
import: https://developer.mozilla.org/en-US/docs/Web/JavaScript/Reference/Statements/import
Memory Management: https://developer.mozilla.org/en-US/docs/Web/JavaScript/Memory_Management
Linked List: Interview Questions and Practice Problems: https://medium.com/techie-delight/linked-list-interview-questions-and-practice-problems-55f75302d613
Linked List Data Structure: https://www.geeksforgeeks.org/data-structures/linked-list/
关于集合
Set: https://developer.mozilla.org/en-US/docs/Web/JavaScript/Reference/Global_Objects/Set
Iterators and generators: https://developer.mozilla.org/en-US/docs/Web/JavaScript/Guide/Iterators_and_Generators
关于字典和散列表
Map: https://developer.mozilla.org/en-US/docs/Web/JavaScript/Reference/Global_Objects/Map
WeakMap: https://developer.mozilla.org/en-US/docs/Web/JavaScript/Reference/Global_Objects/WeakMap
WeakSet: https://developer.mozilla.org/en-US/docs/Web/JavaScript/Reference/Global_Objects/WeakSet
Top 75 Hashing Problems: https://medium.com/@codingfreak/hashing-problems-in-data-structures-c41b77a5119a
关于递归
Mastering recursive programming
Learning to think with recursion, part 1
Learning to think with recursion, part 2
Recursion Practice Problems with Solutions: https://www.techiedelight.com/recursion-practice-problems-with-solutions/
Recursion Problems
参考
《学习 JavaScript 数据结构与算法》第 3 版


 支付宝
支付宝
 微信
微信